
The Request/Response Lifecycle #
In this lab, you’ll explore a Django app and make some changes to how it handles the request/response lifecycle.
👾 💬 Before we begin, a few reflectionsAt the end of the lab, each student will turn in the answers to the questions in the lab.
💻
Do the exploring parts, or you might not understand the questions. (And we want you to be ready for the rest of the unit.)
Make sure you actually read the content of this lesson.
- You will be opening a lot of small files. It takes some practice learning your way around, but you’ll get the hang of it.
- Most of the code you’re looking at interacts with other code you’re not seeing. For example, where’s the code that actually calls
home_viewwith a request? Where’s the code that sends the response back to the client? It’s all there in the Django source–there’s no magic–but you shouldn’t bother reading it.- As you start working with larger software packages, you’ll need to get used to not understanding the whole system. One of the main goals of computer science is to reduce complexity–making complicated problems easier to think about. One main way we reduce complexity is through abstraction, or hiding the parts we don’t need to think about right now.
💻
Let’s get started by making a unit_02 folder.
cd ~/desktop/making-with-code/cs10
mkdir unit05_webapps
cd unit05_webapps
💻 Start by cloning your starter code.
Be sure to change yourgithubusername to your actual Github username.
git clone https://github.com/the-isf-academy/lab_colorama
poetry shell
poetry install
💻
Open the repository in VSCode: code .
You’ll meet some of these files today. For now, the most important file to know
about is manage.py. You’ll always run this file when you want Django to do
anything.
A. Hello #
💻 Let's start up the app and test it out. The first command prepares the database (more on this later); the second command starts the server running on port 8000 on your computer.
python manage.py migrate
python manage.py runserver
Now the server is waiting for requests.
💻 Head over to your web browser and navigate to: http://localhost:8000.
✅ CHECKPOINT:Complete the checkpoints questions on the worksheet as you move through the lab.
A.0: What is the name of the color shown on the web page?
B. How the parts fit together #
Let’s see how the parts of the app worked together to show this page. When a
request first arrives, its URL is separated into a host name and a path. In
this case, the host name is localhost:8000 and the path is /.
💻
Open mysite/urls.py. The file mysite/urls.py declares the app’s routing, matching paths
to views which should handle them.
urlpatterns = [
    path('/', include('color_app.urls')),
    path('admin/', admin.site.urls),
]
This code is actually just importing URLs from other modules–
color_app.urlsandadmin.site.urls.
💻
We’re going to be working with color_app today, so let’s open color_app/urls.py:
| |
Two views are defined. If you go to
localhost:8000/(homepage), the request will be handled byviews.home. And if you go tolocalhost:8000/random/, the request will be handled byviews.random.
💻
Let’s look at these views. You can see that they are imported from color_app.views, so we’ll open color_app/views.py.
| |
The homepage view is just a simple function! It receives a
request, builds aresponse, and returns it. However, the view relies on a few helpers to get the job done.
[Templates] #
Many views use
templates, or pieces of HTML code that can be used to build a webpage. The
call to render on line 16 requests the template color_app/index.html.
(Every app in the project has a folder called templates; when you ask for a
template, Django searches these folders for a match).
| |
There’s a lot here, so we’ll just take a quick tour. This template is made up of
HTML tags like <h1>...</h1> and template commands like {% ... %} and {{ ... }}. The HTML tags will be read by the client’s browser as it presents the webpage; the template
commands tell Django what to do.
extends(line 1) means this template extends another template (in this case,base.html, which you can find incolor_app/templates/base.html. Extending another template works by overriding particular blocks. Here, we are overriding the block calledcontent(lines 3-15).{{name}}(line 6) is a placeholder which will be replaced with the parameter callednamegiven to the template by the view (color_app/views.py, lines 12-16).include(line 7) means include another template. Colorama needs to show color swatches all over the place, so we have a special template just for the color swatch circle.url(line 9) means look up a url by name (color_app/urls.py, line 10). Why not just type in the url? If you change it later, you might forget to fix it here, especially after you have a few dozen templates. And you might want to deploy this site to multiple hosts, likelocalhost:8000while you’re developing it andcolorama.comwhen you’re ready to go public.
[Models] #
In addition to a template, home also uses a model called Color (color_app/views.py, line 11).
Think of views as connecters, and think of models as objects that do most of the work.
💻
The Color model has some neat abilities; let’s check them out by opening
color_app/models.py.
| |
A
Colorhas four attributes:name,red,green, andblue. (Every pixel on a computer display has a tiny red, green, and blue light. So every color can be made by describing how bright each should be.) Thecolor_channel_validatorattached to each color field checks to make sure the color value is between 0 and 255.If you look a little further down, the
Colorclass also has some helpful methods, such as the ability to represent its value in hexidecimal, the way CSS styles expect it. This lets us define aColorand then use it to style our web pages.
Models are just regular Python classes, but they have a special relationship
with a database which can store objects across requests to the server. (This is
why the Color attributes are defined as models.IntegerField: they define how
the data should get stored in the database. Storing
objects in a database and then later retrieving them makes it possible for web
apps to have state: if you create an object, other users will also see it and it
will still be there if you come back later. We’ll come back to this idea
shortly.

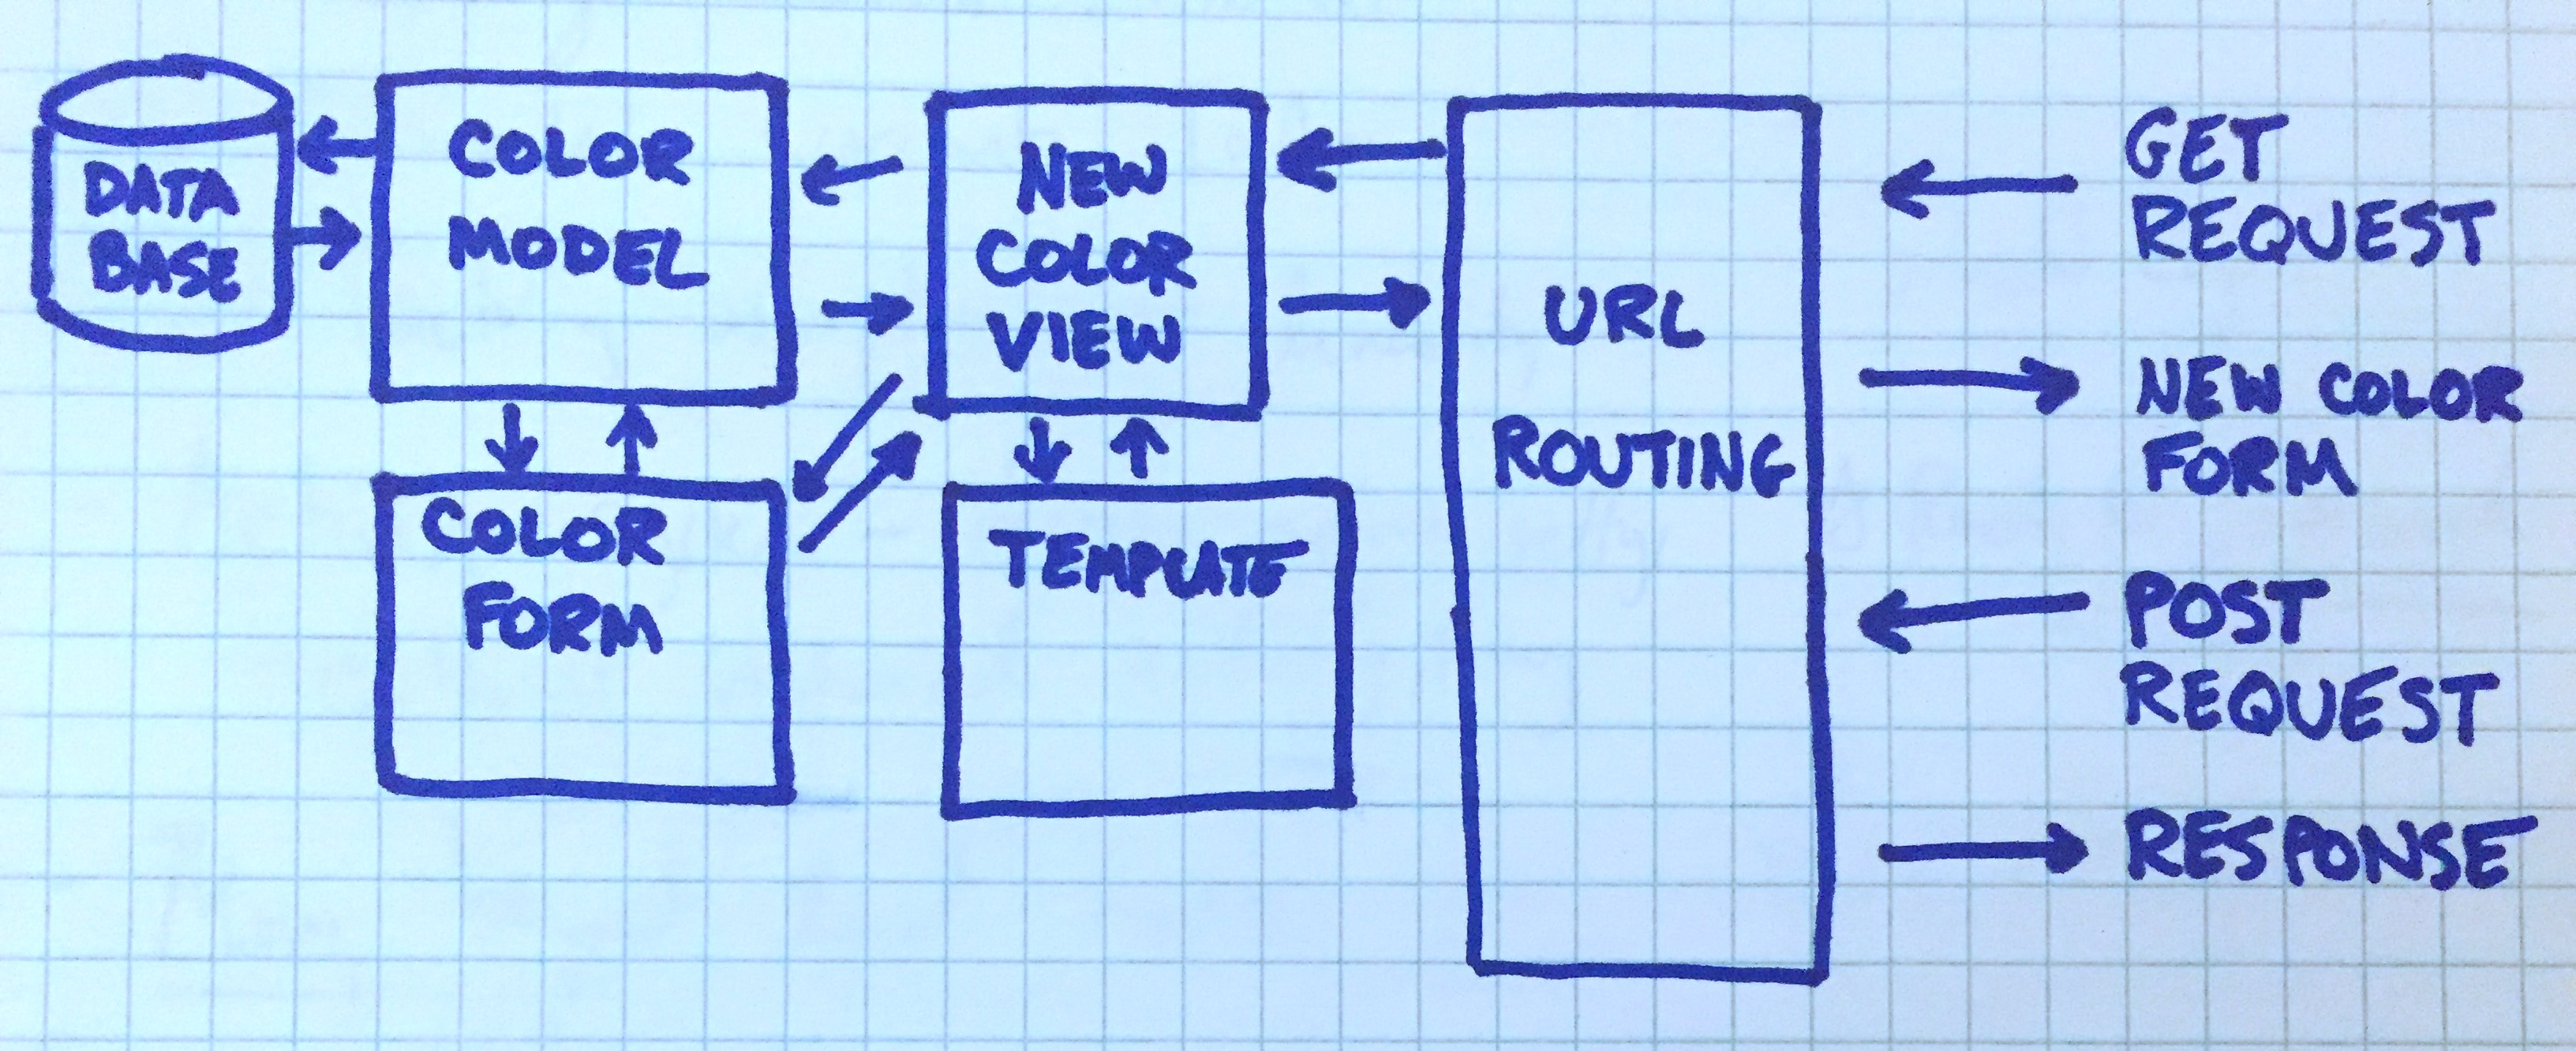
Request/response lifecycle diagram
✅ CHECKPOINT:✏️ B.0: When you go to the home page, it says “Hello stranger” at the top. However, if you look at the template
color_app/templates/color_app/index.html, the word “stranger” does not appear. Explain how the word “stranger” ends up on the page.💻 Then, without changing the template, change the home page so that it says hello to you instead. Explain what you had to change.
💻 B.1: Change the color swatch on the home page to a different color. Explain how to do it.
✏️ B.2: If you didn’t already check it out, go to the random color page. You’ll notice that the color swatch changes every time you load the page, and the background changes to an opposite color. Explain how this works. (Hint: We previously noticed that
/color/randomis served bycolor_app.views.random_color, so start there. Figure out which template is being used. Look in the template to figure out how the background color gets set. Make sure you explain how theColormodel is involved too.)
C. Saving stuff #
Now we’re going to extend the app to let users create their own colors. And
whereas our views were previously functions, now our views are going to be classes.
Some class-based views are provided for you at the bottom of
color_app/views.py. We need to do a little work to wire these in
to the app.
💻
Open color_app/urls.py and uncomment the highlighted lines:
| |
When you save the file, the server will notice the change and automatically restart itself. If you accidentally make a mistake, the server might crash and you’ll need to restart it (just run
python manage.py runserveragain).
💻
Now go to
/colors, and play around. You can now add new colors and see a list of all the colors. If your app were live online, many users could all contribute colors.
Once again, let’s have a look at the code that made this possible. We added two
new URL routes, colors and color/new, and routed them to color_list
and def new_color(request):, respectively.
💻
Let’s look at color_app/views.py functions:
def color_list(request):
    # renders all colors in database

    color_list = Color.objects.all().order_by("name")
    params = {"color_list": color_list}

    return render(request, 'color_app/color_list.html', params)

def new_color(request):
    # processes new color form

    if request.method == "POST":
        form = ColorForm(request.POST)
        if form.is_valid():
            form.save()
            return redirect(reverse("color_app:color_list"))
    else:
        form = ColorForm()

    return render(request, "color_app/color_form.html", {"form": form})
That’s it???
For
color_list(),It set all the colors from the database, sort them somehow, and then gives them to the template for rendering.new_color(), creates an emptyColorForm(e.g. the name isn’t filled in and the colors aren’t set) and gives it to the template, which renders a response. The user sees a page with sliders and a text field to name the color.When the user submits the form (this is a
POSTrequest because it’s making a change; all the previous requests have beenGETrequests),new_color()again receives the request. This time, since it’s aPOSTwith form data (name, color values), it creates aColorForm, checks to make sure the data is valid, and if so, creates aColor, saves it to the database, and then sends a redirect response telling the user to go to/colors.
POST Request/response lifecycle diagram
✅ CHECKPOINT:C.0: There is currently no link from the homepage to the color list, or the form to add new colors. You have to enter the URL directly to get to these pages, and 99% of users (you no longer included) even know how to enter URLs directly.
💻 Add a link to the home page taking the user to the color list page. (Hint: There’s already a link from the home page to the random color page. Use the same pattern.)
✏️ Explain what you did.
C.1: There’s also no link away from the random color page; you’re stuck looping through random colors forever.
- 💻 Decide where the random color page should link to add add an appropriate link.
- ✏️ Where did you decide to link to?
💻 C.2: Make five or six new colors, if you haven’t already. Then look at the color list page. The colors are currently sorted alphabetically (with all the upper-case names first and then the lower-case names).
- 💻 Figure out how to change this page so that colors are instead sorted by how much red they contain.
- ✏️ Explain what you had to do.
D. Wrapping up #
💻
Press Control + C to kill your server.
In this lesson, you learned the basic structure of a Django app, by looking at the files and tracing their execution as they handled a basic request and response lifecycle.
This lesson guided you through the first steps of the official Django tutorial; have a look. We didn’t do everything, but you should recognize some of the steps over there. The sooner you get familiar with the style of Django’s documentation the better. When you get stuck and Google for answers, you’ll find that Stack Overflow often has a quick fix, but you’ll want the Django documentation if you want to really understand what’s going on.